Batch layout
How to prepare a 400 x 400 mm laser batch sheet
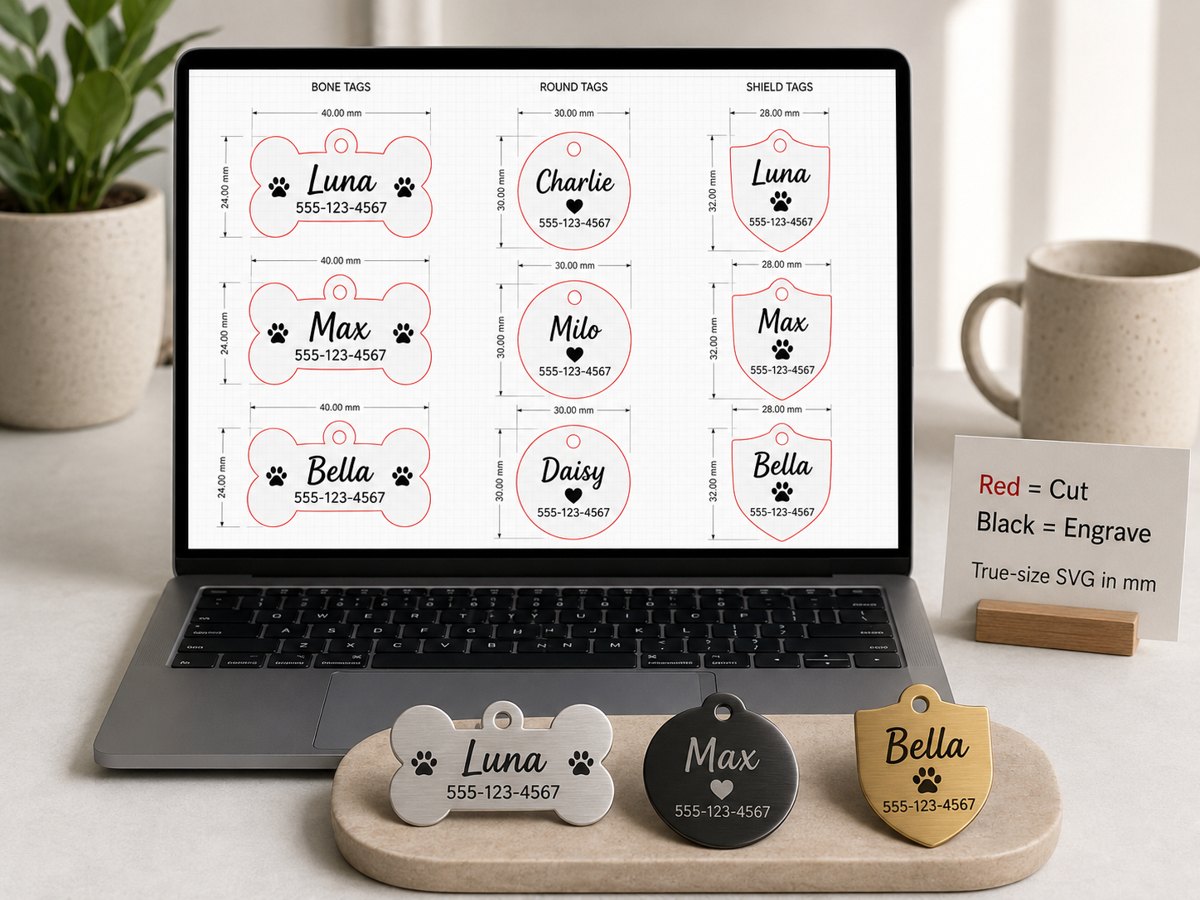
Start with the real product size, leave spacing, keep cut and engrave artwork separate, then import the SVG at 1:1 scale.
Do not start by filling the whole bed
A 400 x 400 mm work area is the maximum machine area. It is not a requirement to fill every millimeter. Start with one real item size first. A pet tag, a leather keychain, a QR label, and a wedding place card all need different margins, spacing, and handling room.
Choose the product size first
The most common mistake is making the artwork too small because the preview looks neat on screen. For a real desktop product, one tag or card still needs a practical physical size. A small tag may be around 30 to 40 mm. A keychain can be 60 to 100 mm. A place card may be much larger. The SVG should reflect the finished product, not only the screen preview.
Use a simple batch rule
- Set the bed size, such as 400 x 400 mm.
- Set one item size based on the material blank.
- Leave a margin around the sheet so the laser does not run at the edge.
- Leave spacing between items for material variation and easier handling.
- Use red strokes for cut outlines and black artwork for engraving or marking.
- Export the SVG and import it into your laser software at real millimeter size.
What fits on a 400 x 400 mm sheet
Pet tags can usually fit as a batch. Wedding place cards may fit fewer per sheet. QR labels can fit many if the finished label is small. The right answer depends on the product size and spacing, not the bed size alone. SpiderMake uses the work area to preview the sheet so the output behaves more like a production file.
Check before production
Open the exported SVG and confirm the scale, cut outlines, text placement, and layer behavior. Then import the same file into LightBurn, xTool Studio, EZCAD, or your preferred laser software. Always run one material test before a customer batch.
Open a free SpiderMake tool, choose a product, and export a laser-ready SVG sized in millimeters.
Open free tools Download sample SVG